Guide for Apple iPhone running iOS6
This guide was produced with material from Make Use of IT and with help from Tim Brookes. Dive in or jump to a section:
Index:
Lock Screen | Home Button | Searching & Switching | Notifications | Telephone Calls | Face Time | Camera | Photo Management | Messaging & SMS | E-mail | Calendar | Safari
1. Unlocking and Home Screen

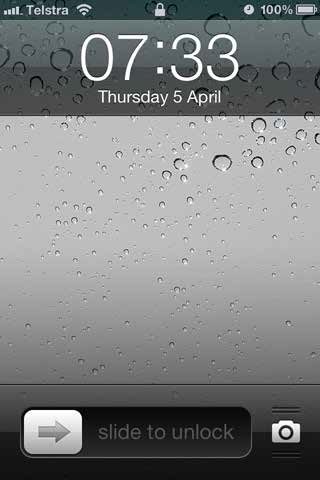
Starting with the basics, the first lesson in this course will tackle the iPhone’s lock screen. The iPhone lock screen is basically the screen that you see when the iPhone is first powered on by pressing and holding the sleep button (on the top of the iPhone), or woken up from standby mode by either pressing on the sleep button or home button (the round button near the bottom). It consists of the time and date, a slider that is used to unlock your phone, an area for notifications and a status area at the top of the screen for checking battery percentage and signal strength.
The Lock Screen

When you slide the “Slide to unlock” slider you will be prompted for your personal passcode before your phone will unlock, if you have one. A passcode is important because without one your lock screen only provides protection against accidental taps and swipes, whereas a passcode ensures all your data is locked behind a 4-digit number only you know.

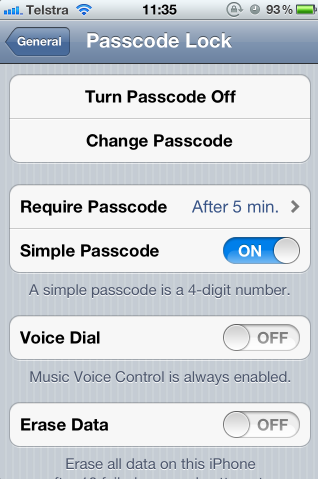
If you have yet to set a passcode then you can do so via your device’s Settings > General > Passcode Lock. Once you have set a passcode you can change how often you need to input it using the Require Passcode setting. If you set Require Passcode to 5 minutes, your phone will be unlocked for 5 minutes after you last touched it before the lock is re-engaged (it is advisable not to set this number too high). The Passcode Lock menu also allows you to remove or change your passcode and turn on Erase Data which will wipe your phone of all data should the passcode be entered incorrectly 10 times.
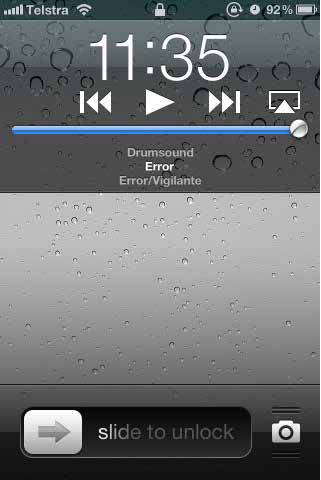
There are a few other features that can be accessed via your lock screen. Double-tapping the home button in quick succession will reveal media controls, including play/pause and previous/next track buttons. If your iPhone is in range of an AirPlay device (such as an Apple TV) then the AirPlay share symbol will also appear – tap it to wirelessly share your media. If you are currently listening to a song then the album artwork will display here in place of your lock screen wallpaper.
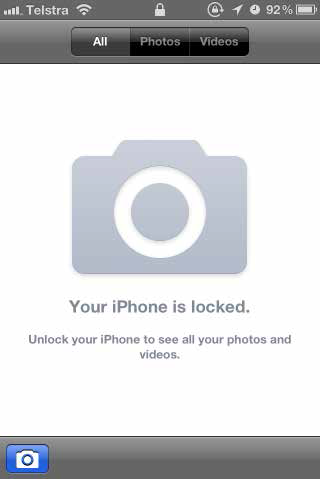
A camera slider should be visible in the bottom right of the screen, slide it upwards for direct access to the Camera app from where you can start taking pictures. Despite this Camera shortcut bypassing your passcode if you have one, your Camera roll will not show previous pictures taken before the current session.
Holding the home button will activate Siri if you own an iPhone 4S or 5 or a simpler Voice Control interface for iPhone 4 and earlier
The Home Screen
The Home screen is essentially your device’s “main menu” and acts as a gateway to virtually every function on your phone. This is where your apps are stored, settings are accessed and searches are conducted. You should take some time to familiarise yourself with the various icons as there are a few you will be using a lot. Settings, Phone, Mail, Safari and Messages are probably going to be high on that list, so when it comes to re-arranging your home screen it’s best to keep these in an easy to find place. The home screen is divided into pages and each page supports a maximum of 16 icons minus the dock area at the very bottom of the screen. The dock provides space for 4 icons that are always available, regardless of which home screen page you are on. It’s best to put your most frequently used applications here. Spotlight, your iPhone’s in-built searching utility, is positioned on the home screen. Swipe right to left until your screen dims and a keyboard appears. This utility will search your whole iPhone including contacts, email messages, web searches and individual apps themselves, and we’ll be covering it in full in a future lesson. To rearrange icons, tap and hold any icon until they all start to shake.
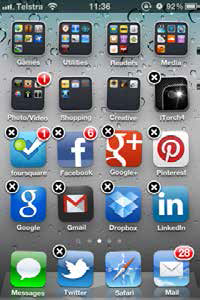
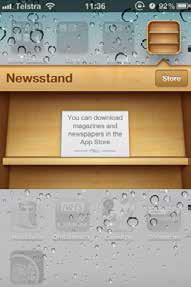
In this view it is possible to pick up and arrange apps, as well as move them to different pages of your home screen. To create a folder pick up one app and drag it onto another – your phone will attempt to work out a suitable name for the folder, or you can tap the text and name it yourself. It is not possible to have folders with only one item in them, and it is not possible to put the in-built iOS app Newsstand into a folder (as it is a folder itself).
You can delete any app you have installed, but this does not include any of Apple’s core apps. To delete an app tap and hold until your home screen icons start shaking and tap the X (cross) next to the icon. You will be prompted to confirm your deletion before the app is gone for good.

Test Yourself
Now that you are familiar with the lock screen and home screen, try the following:
• Launch the Camera from the lock screen
• Play and pause a song from the lock screen
• The next time you receive a notification, try accessing that application from the lock screen
• Re-arrange your home screen
• Create and delete a folder
Remember: If you’re not entirely sure how to do any of these, refer back to the text and find out, the answers are above.
2. Home Button
Your iPhone’s home button is the only button on the face of the device and serves one primary purpose – to return you to the home screen. There are a few other uses for the home button, some were explored in our earlier lessons and the rest we’ll come to later. For now we’ll go over the basics of your iPhone’s only physical face button.
Home Button Functions
Whatever you’re doing on your iPhone – browsing messages, changing settings or running an app – a single press of the home button should return you to your first home screen and minimize all other activity. When you’re viewing your first (main) home screen, pressing the home button will bring up Spotlight search and pressing it again will return you to your first home screen (you can also swipe left and right).
The home button can also be used to display your apps in the last order that you used them. Your iPhone does not provide a true multi-tasking experience, which means you cannot run multiple apps at the same time. When you press the home button to exit an app, the app simply freezes its current state so that you can resume from where you left off. Whenever your phone is unlocked double-tapping the home button will show the app switcher, which will be detailed in full, next lesson. A single tap of the home button will close the menu and return you to your normal home screen.
Voice commands (Siri for iPhone 4S and 5 owners, Voice Control for iPhone 4 and below) can also be triggered using the home button. Press and hold the home button at any point (including when your phone is locked) to trigger Siri or Voice Control, wait for the beep and then talk to your device. To cancel voice commands tap the home button a further time. We’ll be covering Siri in more detail in a future lesson.

It is also possible to assign an additional function of your choosing to your home button. Your iPhone has support for a triple-click-home function which will activate by quickly pressing the home button three times in a row. These are generally Accessibility functions, and are found by going to Settings > General > Accessibility and choosing the final item on the list; Triple-click Home.
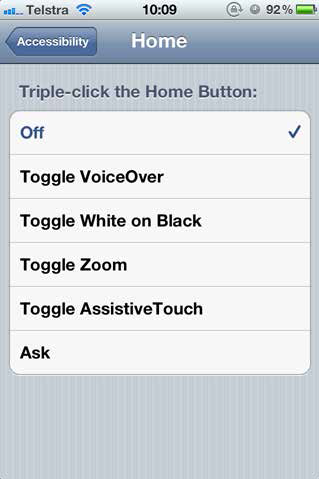
Available actions include:
• Toggle VoiceOver (speech to text)
• Toggle White on Black (improves readability for those with sight impairments)
• Toggle Zoom (allows you to zoom in anywhere on screen)
• Toggle AssistiveTouch (for gesture-based control)
• Ask (asks you which over the above four options you would like to enable)
Test Yourself
Now that you’re familiar with the basic functions of the home button try the following:
• Exit an app using the home button
• Reveal the app switcher
• Activate Siri/Voice Control
Remember: If you’re not entirely sure how to do any of these, refer back to the text and find out, the answers are above.
3. Searching, Switching & Orientation
Apple’s desktop operating system, OS X, comes with a powerful search feature called Spotlight. The iPhone comes with a similar tool for quickly finding things on your phone. It can be used to search email and messages as well as music and video content, contacts, apps, notes, calendar events and reminders.
Searching Using Your iPhone
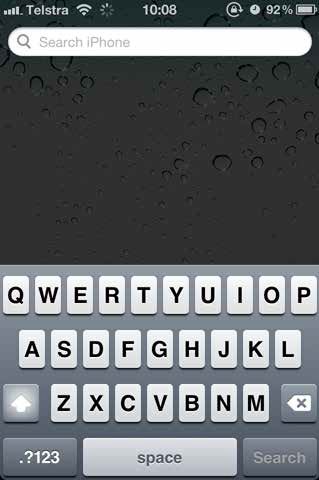
Spotlight is accessed by swiping right to left (or pressing the home button) on your primary home screen.

Just start typing and your iPhone will start searching. Results will be displayed with an icon to indicate what each result is, and at the very bottom of the list will be an option to search the Web or Wikipedia. To view a result, tap it.
You can change what your phone searches for and the order in which your search results appear under your iPhone’s preferences. Go to Settings > General > Spotlight Search. Tap an item to toggle its visibility and tap and drag the icon to the left of a selection to reorder results.

Using the App Switcher
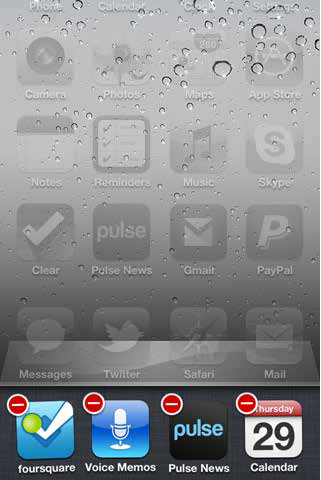
Last lesson we took a look at the home button and its many uses. To recap, double-tapping the home button in quick succession reveals the app switcher. This allows you to resume an app by tapping it. You can swipe through the last used apps in the list though be aware these apps are not running in the background, but simply frozen from where you left them.
The app switcher is a really useful feature as it means you can get to an app quickly without having to go back to your home screen. You can also kill apps using the app switcher, which is useful when an app repeatedly crashes or refuses to load. To kill an app tap and hold an icon in the app switcher until the icons begin to jiggle. You can then kill the app by tapping the red badge that appears next to the icon, much in the same way you learned to delete apps in lesson two.
The app switcher also has a few other uses, accessed by swiping left to right. A single swipe will reveal playback controls (skip previous, play/pause and skip next), an icon which defaults to Music but displays whichever app is currently playing media (far right) and the orientation lock button(far left).
The orientation lock button will lock your phone in portrait orientation, disabling automatic screen rotation to landscape mode when you tilt it sideways. When enabled, orientation lock is signified by a small icon at the top of your screen near battery status – if it’s there your orientation is locked, otherwise consider it disabled.
![]()
The dynamic icon on the right will display as Music by default, and tapping it will open your library. If you have another app currently playing media, tapping it will take you straight to the app. This is useful for favoriting songs, videos and controlling other features of media apps quickly.

One final swipe left to right reveals the volume control bar, and if applicable an AirPlay button for streaming your media to AirPlay-enabled devices. To close the app switcher single tap the home button.
Test Yourself
Now that you’re familiar with these functions, try the following:
• Switch to an app without using the home screen
• Kill an app using the app switcher
• Lock portrait orientation on your iPhone, then switch back
• Resume or pause playback using the app switcher media controls
Remember: If you’re not entirely sure how to do any of these, refer back to the text and find out, the answers are above.
4. Notifications and Badges
Notifications are one of the best features your smartphone has. If you love being connected to your Mail, social networks and other apps and services then notifications keep you immersed at all times. In Apple’s last big refresh of iOS they added the Notification Centre, which records and collates all incoming pings for easy perusal.
Notifications & Badges
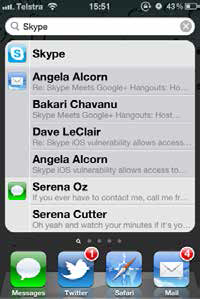
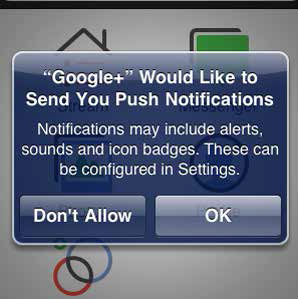
There are many apps that take advantage of your iPhone’s ability to receive notifications that are “pushed” to your device over the Internet (hence the term push notifications). Each time an app requests access, it will prompt you (see image, right). By accepting this request you are granting the app permission to send you notifications that will appear on your screen as a banner, on your lock screen and in an area known as Notification Centre. Banner notifications appear at the top of your screen, are non-intrusive (they don’t require any action to dismiss, just wait and the notification will disappear) and tapping one while it’s on-screen will take you to the app responsible. This is a message notification banner, tapping it will open that particular message in Messages:
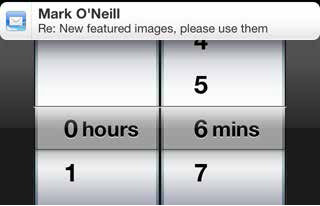
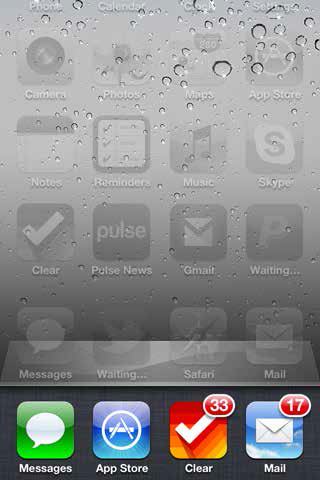
Many apps also make use of badges to keep you better informed. Badges keep a tally of events you may have missed, for example if you have 10 unread email messages then a small number 10 will be shown in a red badge over the Mail app. The App Store is another core app that uses badges to indicate the number of updates that are available for installed apps.
![]()
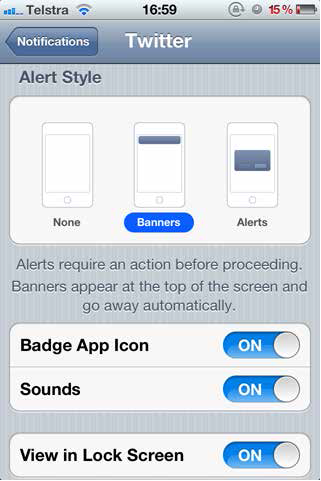
You can change the way your iPhone notifies you using the Settings > Notifications menu. In order to disable or change preferences tap any app on the list. Options include the ability to change how many items are displayed, the type of alert displayed and whether the app should show a badge, make a sound or appear in your lock screen.
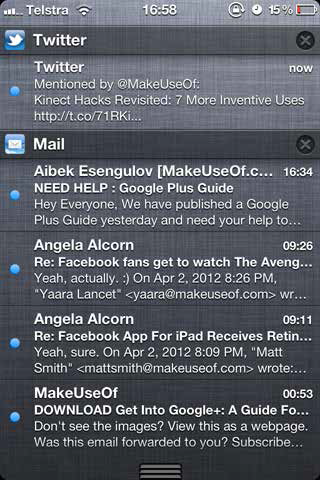
Notification Centre All notifications you receive (but don’t immediately act upon) will end up in the Notification Centre. To access the Notification Centre swipe from the top of the screen vertically downwards. Tapping any notification listed within will open the corresponding app, in many instances taking you to the message, email or Tweet that the notification refers to. To close this menu, swipe from the bottom of the screen vertically upwards.
Notifications and Notification Centre are not mutually inclusive – you can still receive notifications but not have them show up in the Notification Centre. To remove an item from your Notification Centre open Settings > Notifications and tap Edit in the top right. You are now free to drag items from the “In Notification Centre” section to the “Not in Notification Centre” section below. It is also possible to have widgets in the Notification Centre, and the two that are included with your iPhone – Stocks Widget and Weather Widget – can be added and removed using the same method you would add or remove any item, described above.
Test Yourself
• Open the Notification Centre and investigate a notification
• Touch the next banner notification you receive
• Check Notification Centre for any apps you don’t want notifying you
Remember: If you’re not entirely sure how to do any of these, refer back to the text and find out, the answers are above.
5. Calling
![]()
With all the features and apps available for your iPhone it’s sometimes easy to forget one of the most basic functions – making a phone call. Your phone keeps your contacts and dialling keypad in one neat location which I’d recommend keeping either in your dock or on the first home screen for easy access at all times.
The Phone Interface
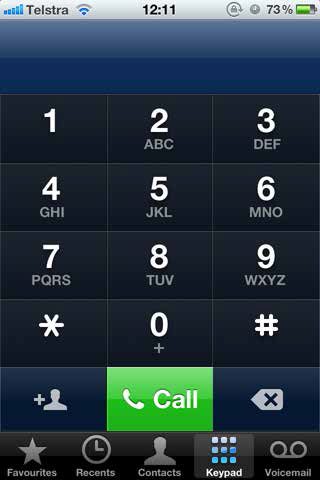
Everything related to your iPhone’s abilities as a mobile phone are found under the green Phone icon on the home screen. In this interface there are five tabs – Favourites, Recents, Contacts, Keypad and Voicemail.
The Favourites tab allows you to add a select few favourite numbers from your contacts list for easy access. To add a contact, click the “+” (plus) in the top right. The Recents tab is a record of calling history, both FaceTime and standard calls are listed here. To remove an item from your call log tap Edit in the top right, tap the red badge next to the entry you wish to remove and then hit Delete.
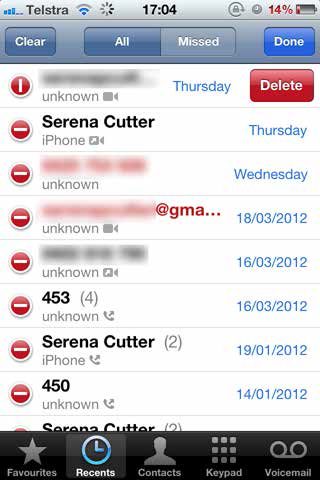
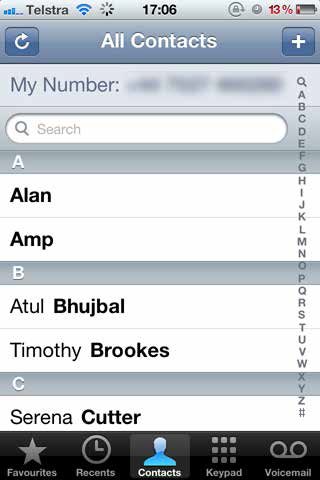
You can also view your entire call history with a particular number by tapping the blue arrow next to the entry on the Recents tab. The middle tab is Contacts, and this is a complete list of all identities stored on your phone. Your current phone number will always be listed at the top of this tab, simply pull the list down to reveal it. Adding a contact is accomplished by clicking the “+” (plus) in the top right, and the Refresh icon in the opposite corner queries for updates from iCloud (more on this in later lessons).
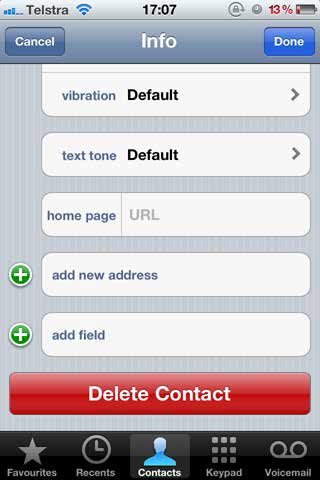
To edit or delete a contact first select the entry you would like to modify from your list and then click Edit in the top right corner. Phone numbers, email and other details are stored under labels like “mobile”, ‘iPhone” and “home”. In order to change the label (for example you would like to add a business number instead of a home number) touch the label and choose or input a new one. You can also assign custom ringtones, vibration settings and any other custom fields you like on this screen. In order to delete a contact, scroll all the way to the bottom of the list and tap Delete Contact.
By now you may have noticed the Contacts icon on your home screen, which is nothing more than a shortcut to the Contacts tab under Phone. If you want to regain some space on your home screen you can hide this duplicate icon by putting it into a folder if you like. Voicemail is a one-touch operation – tapping this tab will immediately dial your voicemail, so be careful not to touch it by accident.
Calling & In-Call Options
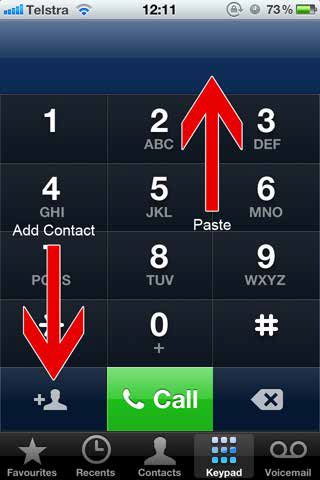
To make a call, you can bring up the Keypad and enter the number you wish to dial before tapping the green Call icon. If you have a number saved to your clipboard you can tap the space just above the keypad and choose Paste. You can also use the Keypad to add a new contact to your phone by entering the number and touching the add contact button in the bottom left.
To call a contact, open the Contacts tab, select a contact and then tap the number you would like to dial. During a call you have a few options available:

• Mute – this mutes the call, tap again to unmute.
• Keypad – this reveals the keypad, handy for touch-tone services that require you choose an option.
• Speaker – you average speakerphone, tap again to disable and return to handset use.
• Add Call – this will pause your current call so that you can make another. You can also hold a conference call with up to 5 others by calling each person with the Add Call button then tapping Merge Calls.
• FaceTime – this will attempt to establish a FaceTime video call with the person you are calling (more on this next lesson).
• Contacts – this option returns you to your Contacts while maintaining the call in the background.
Receiving, Rejecting & Silencing Calls
Your iPhone will behave differently when receiving a call depending on whether it is locked (i.e. you are not using it) or not. If your phone is locked you will see a familiar lock screen with a slider that says “Slide to Answer”.

If your phone is unlocked you will have two options, “Answer” or “Decline”:
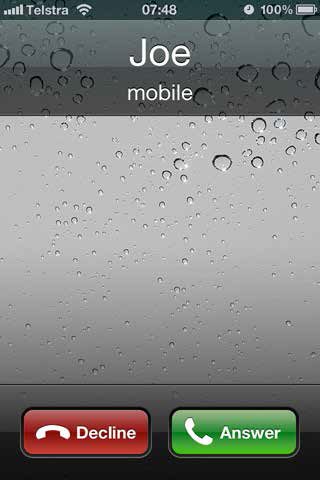
To silence the call (turn the ringer off but not reject the call outright) tap the physical sleep button or either of the volume buttons once. You can reject a call by tapping the sleep button twice in quick succession. To end a call that is currently active, tap the red End button. If you are currently using your phone then you will instead be able to choose from Decline and Answer, as well as being able to silence the call using the sleep and volume buttons.
Test Yourself
• Add a dummy contact to your phone, add them to your Favourites, then delete the contact
• Browse your recent call history
• Make a call and use speakerphone
• The next time you receive a call, silence the ringer before answering
Remember: If you’re not entirely sure how to do any of these, refer back to the text and find out, the answers are above.
6. FaceTime
![]()
FaceTime is Apple’s proprietary video calling service available to iPhone, iPad, iPod Touch and Mac users. Using your device’s front facing camera located near the earpiece you can video call your friends with compatible devices completely free of charge. FaceTime does not appear on your phone as a dedicated app, but is instead integrated into the operating system.
Setting Up FaceTime
You can use FaceTime to make video calls when connected to Wi-Fi, but not on 3G/4G unless your device has been jailbroken (which we’ll touch upon in the last part of this course). In order to use FaceTime you will need to have registered an Apple ID, and be logged in under Settings > Store > Apple ID. Once logged in, by default users can FaceTime you using your Apple ID email address and current phone number. You can change or add email addresses you would like to be reached at under Settings > Facetime then click Add Another Email… in the “You can be reached…” section, or select an existing email to remove it. Once you have added a new email address you will have to sign in with your Apple ID password to complete the verification process.

This menu also features an option for your Caller ID, which is what other parties will see when you call them using FaceTime. By default this setting is your current phone number, though you can change it to display any of the email accounts listed under “You can be reached…”. To disable FaceTime entirely you can switch it off from this menu, but if you do intend on using it ensure that the service is turned on.
Calling via FaceTime
You place and receive calls using FaceTime the same way you would make a standard phone call. Your iPhone will let you call anyone with FaceTime, though only those with FaceTime-enabled devices will actually be able to accept the video call. This is useful and ensures there is no waiting around for the FaceTime option to show up after adding a contact, but remember that not all of your contacts are going to be able to accept.

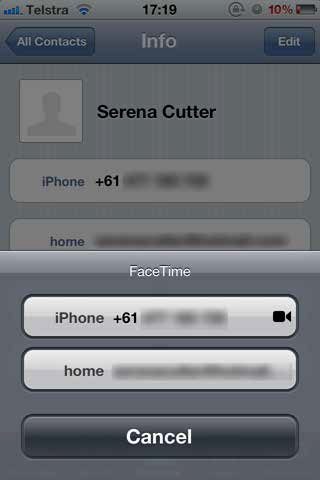
To call, select a contact in your address book and tap FaceTime. If you have multiple numbers or email addresses stored for the contact then you will be asked which address to call, and if you’ve previously had a FaceTime conversation you’ll see a video icon as per the screenshot below:
Once you have placed the call or someone has decided to call you the front-facing camera will activate and show you as you will be seen by the other party.

After the call has been accepted you should see the person who you are calling, and a small image of yourself in the corner. During the FaceTime call you have three options available from left-to-right at the bottom of the screen: • Mute – this will mute the call, but it won’t pause the video
• End – terminates the current call
• Camera-switch – this toggles between the rear-facing and front-facing cameras
Test Yourself
• Make yourself reachable via a secondary email address over FaceTime
• Place a FaceTime call
• During a FaceTime call switch to the rear-facing camera
Remember: If you’re not entirely sure how to do any of these, refer back to the text and find out, the answers are above.
7. Camera Introduction
![]()
The iPhone 5 and 4S come with an 8MP rear-facing camera with surprisingly good low-light performance over its predecessor, and shoots 1080p video at a resolution of 1920×1080. The iPhone 4 comes equipped with a good 5MP camera and can capture 720p HD video at a resolution of 1280×720. Both models offer great still and video performance, but remember that using the camera puts quite a strain on your battery.
Taking Photos and Shooting Video
Your iPhone is equipped with a more than capable camera that makes snapping and sharing photos quick and easy. You will find the Camera app on your home screen, or you can get there quickly when your iPhone is locked by touching and sliding the camera icon vertically (iOS 5.1+) as per this screenshot:
If you are still running iOS 5.0/5.0.1 (you can check in Settings > General > About under Version) try double-tapping the home button then tapping the camera icon that appears, as below:

If neither of these options are available then there’s a good chance you’re still running iOS 4, and in that case I’d recommend updating your phone to the latest software version with iTunes (choose Update on the Summary tab for your device). The first time you launch Camera you will be asked to grant permission to access location services, and you should enable this option if you would like your photos to be geographically tagged (geotagged). If you would like to enable or disable this setting then you can do so from Settings > Location Services. The camera will default to the mode you last used – so if you were last taking a video, your camera will launch in video mode and vice-versa for photos. You can toggle modes between still photo and HD video using the switch in the bottom-right (with your phone held in the portrait position).

In the opposite corner will be a small thumbnail of the last photo or video you captured, tap it to be taken to your Camera Roll to access photos you have taken. You can also swipe the camera viewfinder left-to-right to reveal your photos. To capture a shot tap the large camera icon button, or turn your phone landscape and shoot using the volume “+” button much like you would on a real camera. Take note of the focus, which you can adjust by tapping anywhere in the frame to focus the shot on a particular object. If your iPhone detects faces, it will highlight them with a green box and focus accordingly. The only difference between shooting video and still photos on an iPhone is that you will have to press the shutter again when you want a video to end. Just like setting up a photo, you can refocus your camera during a video by tapping on the object in the viewfinder. It is also possible to take pictures or video using the front facing camera by tapping the switch camera icon on the viewfinder. This is in the top-right if your phone is in the standard portrait position, opposite the flash mode toggle:
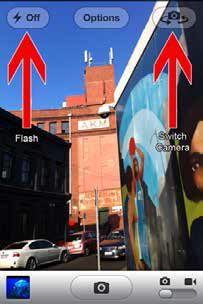
The camera has three flash modes which operate identically in both still photo mode and video mode:
• On – this will force the flash to fire every time you take a picture
• Auto – depending on the ambient light, your phone will decide whether the flash is required or not
• Off – the flash will not fire, even if the scene is very dark
Capturing Screenshots

Your iPhone also has the ability to instantly capture whatever is on the screen with a handy shortcut. To take a screenshot press the home button and sleep button at the same time. The screen will go white, and provided your phone is not muted you should hear a shutter sound.
Your screen captures are automatically saved in your Camera Roll and can be found under Photos on the home screen.
Test Yourself
• Launch the camera, take a picture and then view it
• Switch from photo mode to video mode and shoot a short video
• Take two photos of the same scene with different points of focus
• Take a photo or video using the flash
• Capture a screenshot
Remember: If you’re not entirely sure how to do any of these, refer back to the text and find out, the answers are above.
8. Photos viewing and sharing
![]()
The Retina screen on both the iPhone 4, 4S and 5 have one of the highest pixel densities of any mobile device. This means pictures look nothing short of great and long passages of text are surprisingly easy to read thanks to antialiased, crisp fonts. If you look closely at your iPhone’s screen you will notice that you can’t actually see individual pixels – go on, try it now.
Viewing & Sharing Photos
Tapping the Photos icon on your home screen reveals your albums, and by default there will be two available – Camera Roll and Photo Stream. All photos and videos you take are organised into the Camera Roll by date taken. If you have iCloud enabled your photos will be automatically uploaded and added to Photo Stream when you’re connected to Wi-Fi. If you haven’t got iCloud set-up don’t worry as we’ll be covering it in detail in a later lesson.

On the default Albums tab select Edit then Add to create a new album or delete any unwanted albums by tapping the corresponding red badge that appears followed by Delete. Tapping an album will reveal the last added photos to that album, tapping a photo will display it.

While you are viewing a photo you have three options on screen:
• Share button (bottom left) – Reveals options for sharing your photo via email, message and Twitter as well as options for assigning the picture to a contact, using the picture as a background and the print dialogue:
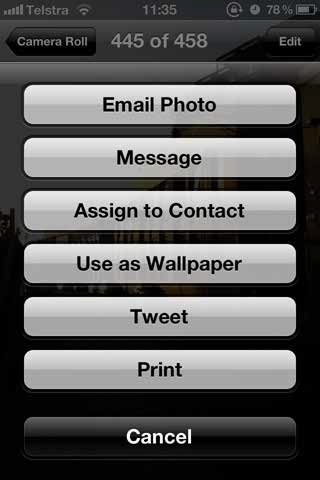
• Play button – for playing your photos as a slideshow
• AirPlay button – for displaying the photo on a nearby AirPlay device (e.g. Apple TV)
• Trash button – to delete the currently displayed photo (requires confirmation)
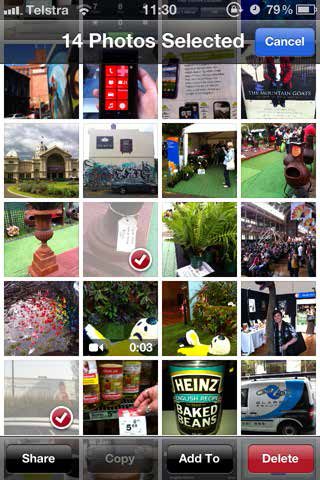
While browsing an album you can batch organise, share and delete photos. Simply tap the Share button in the top right and choose photos by tapping as many as you would like. You can then choose from four options at the bottom of the screen:
• Share – enables sharing of photos/videos via email or the printing of multiple photos
• Copy – copies the currently selected items to your clipboard
• Add To – allows you to add photos to a new or existing album
• Delete – for the batch deletion of photos that are no longer wanted (requires confirmation)
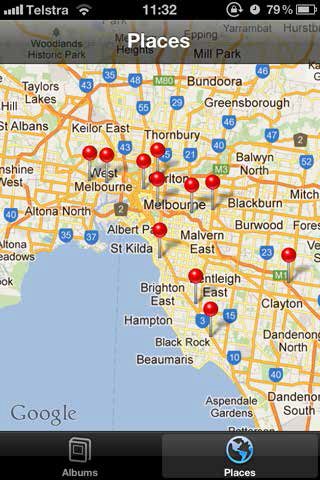
Places, Events & Faces
Places puts your geotagged photos on a map. If your photos are not appearing on the map then there’s a chance that your Camera app cannot access Location Services (change this under Settings > Location Services and ensure Camera is “On” to tag future shots). Also note that if you have a high concentration of photos in one area you will have to zoom in to be able to view them all.
Two other options that will be available to users who sync their phone with iPhoto on Mac OS X are Faces and Events. If you’re already familiar with iPhoto on OS X then you’ll be aware that faces are automatically detected before you’re asked to label them accordingly. This is similar to events, whereby iPhoto organises groups of photos by events and then asks for a label. If you spend a lot of time in iPhoto organising your photos then these settings will be pushed to your iPhone once you have paired your phone with your Mac (which will be covered in an upcoming lesson).
Test Yourself
• Create a new album
• Add some photos to the album you have created, then delete it if required
• Email a batch of photos
• View your photos on a map
Remember: If you’re not entirely sure how to do any of these, refer back to the text and find out, the answers are above.
9. Typing

Typing on your iPhone will take some getting used to if you don’t have much experience typing on a touchscreen device. If you’re used to typing on a PC then you’ll get on well with the QWERTY keyboard considering you already know the basic layout. The limited screen size does mean that some functions require an extra tap or two to reach, but there’s just about every symbol, accent and special character you will ever need at your disposal.
Typing, Undo & Accents
First thing is first – if you ever make a mistake while typing you can undo by shaking your phone. If you find the standard portrait keyboard restricting then bare in mind that landscape view provides a larger keyboard on which to type (though not all apps and functions allow it).

Your iPhone’s entire keyboard is spread over three separate areas. The first is the standard alphabet as you can see above. Tapping the “123” button in the bottom left the second set of characters is revealed, which consists of numbers and symbols:
By tapping the “#+=” button in the bottom left (above “ABC”) the second set of symbols is displayed:
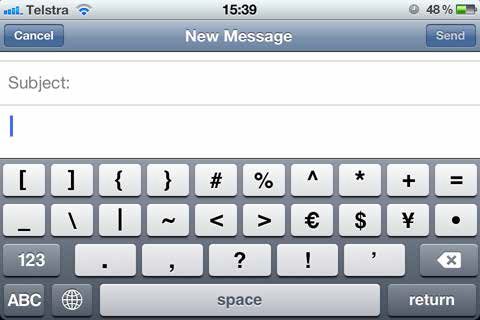
To get back to the standard QWERTY keyboard at any time, tap “ABC”. Note: The keyboard featured in these screenshots is the British English version, so don’t worry if yours looks slightly different. You can access accented characters like ‘ç’ and ‘¡’ by holding your finger down on a key for a second until more options are revealed to you. This works in a logical way for accented vowels, inverse exclamation and question marks and other characters. While typing, double-tapping the space bar in quick succession will add a full stop and space “. “ so you can continue typing in a new sentence.
Additional Keyboards & Emoji
It is possible to add additional keyboards to your iPhone which are accessible from all areas that require text input. To do this, navigate to Settings > General > Keyboard > International Keyboards. On this screen tap Add New Keyboard… and navigate through the choices. To choose one, tap it.
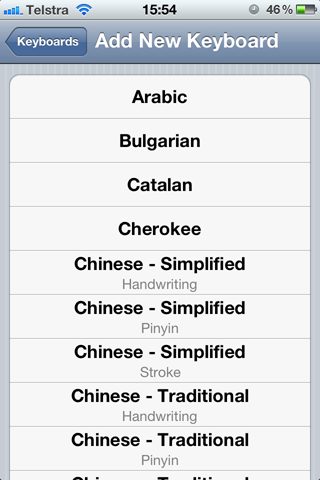
If you would like to be able to send smilies known as emoji between iOS devices then add the Emoji keyboard using the instructions above. To use any of your international keyboards tap the globe icon in the bottom-left of the screen as indicated in the screenshot below:
![]()
You can use this button to toggle between keyboards at any point, and even compose messages, email and notes using a combination of inputs.
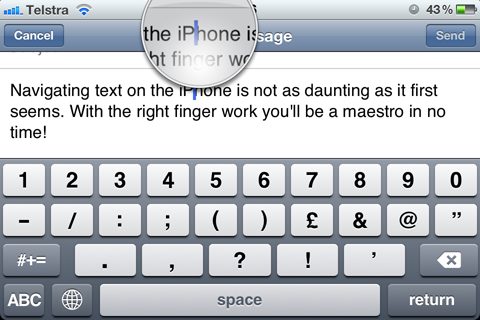
Cursor Control, Text Selection and Clipboard
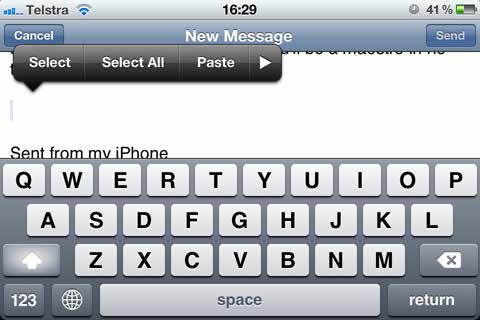
Controlling the text in front of you might seem impossible at first, but once you’ve nailed the technique you’ll never have to worry about it again. A single tap over editable text will move the cursor to a position just before or just after the closest word. To precisely position the cursor, tap and hold your finger over the text until the loupe (magnifying glass) appears. The loupe displays just above where your finger is touching so you can see what you’re doing. With your finger held down, you can drag the cursor to the exact part of the text you wish to edit:
It is also possible to highlight text using your iPhone, just as you would on a PC. To highlight text, double-tap, hold and drag (this can take a bit of practice). You will see a rectangular loupe as your drag, again so you can see what you’re doing:
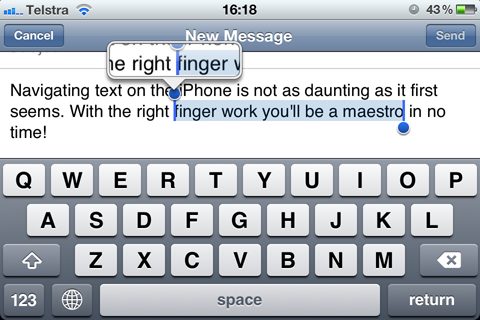
If your selection isn’t perfect, don’t worry as you can use the two blue circles to change the selection area by dragging them wherever you would like. Once you have selected a portion of text you can Cut or Copy using the onscreen controls or cursor into the selection (i.e. replace the text) if you already have something in your clipboard. To paste into a text area, quickly tap and release the blank space in front of your cursor and choose Paste.
Test Yourself
• Type “55%” using your iPhone keyboard
• Type “café” with the accented “é”
• Highlight and copy a selection of text to clipboard, then paste it below the selection
Remember: If you’re not entirely sure how to do any of these, refer back to the text and find out, the answers are above.
10. iMessage and SMS
![]()
Text messaging, or SMS, has long been a quick and non-intrusive way of contacting friends and family. The iPhone builds on this by introducing its own SMS-style messaging service, which is free to use between iOS devices. Thankfully it’s easy to tell the difference between the two, and even save yourself some money by forcing your phone to send only free messages to iPhone owners in the future.
The Basics
The green in-built Messages app is where you will find all your SMS (text messages) content, picture messages and a feature that’s new to iOS 5 – iMessage. Messages are threaded for your convenience, and on your iPhone’s screen displays messages in speech bubbles, like an instant message conversation.
You can search your inbox using the search field at the top of the screen (you can also use Spotlight, which was mentioned in lesson 4) or just tap a thread to read the messages within. To compose a new message touch the button in the top-right hand corner.
 iMessage
 iMessage
Apple introduced iMessage, a closed IM platform for iPhones, iPads and Mac OS X computers. Using iMessage you can chat to anyone with an iOS device or Mac with OS X Mountain Lion for free, without incurring SMS charges from your carrier. Your iPhone will automatically detect users with iMessage-enabled devices when they are added to your address book. Users can receive iMessages using their iPhone’s mobile number (regardless of country) and a choice of email addresses.

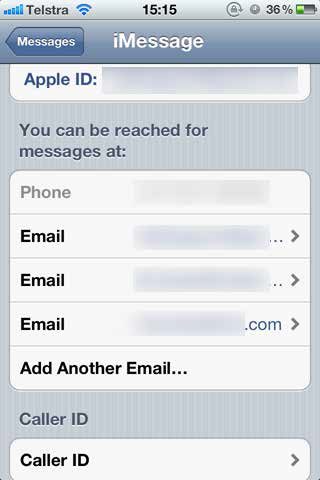
To configure iMessage (and ensure that it is enabled on your device) navigate to Settings > Messages and make sure iMessage displays “On”. Scroll down to the bottom of the page and tap Receive At to add email addresses at which you can be contacted. This screen also allows you to choose your Caller ID, which is the address that others will see attached to messages you send.
In the previous Settings > Messages menu there is an option called Send As SMS. If this is enabled, users who use iMessage (other iPhone users, for example) who are unable to receive your iMessage for some reason will be sent an SMS instead. If you would rather that the message be delivered for free via iMessage every time (albeit delayed) then you should change this setting to “off”.
Having a Conversation
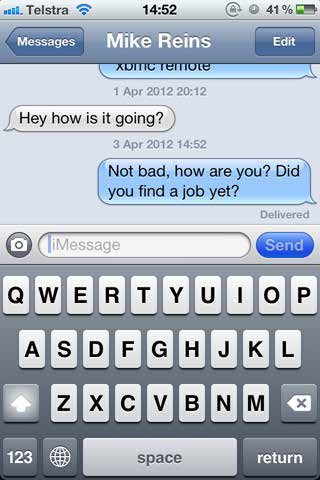
Messages you send as SMS will appear as green bubbles. Before you send them, your Send button should also be green to denote that your carrier will charge you (or take it out of your monthly allowance):

Messages that appear as blue are iMessages, and these are free to send. Similarly, your Send button should be blue before you send the message, denoting that you will not be charged. Another plus point to using iMessage is that you will be notified when someone is typing a message, as displayed in the screenshot below by the ellipsis (this only works for one-on-one chats):

Your iPhone can send pictures and videos from this interface using the camera button to the left of the typing area. If the recipient is using iMessage then this will also be free. If you would like to organise a group chat you can add a selection of iMessage users to a new message from the Messages app. As you add them, recipients should appear with a blue background behind their names as per the screenshot below:

It is also possible to add multiple non-iMessage devices to a message thread, though this won’t work for a group chat as each device will reply to you individually.
Test Yourself
• Compose a new message and add a contact to the conversation
• Add a new email address so you can receive iMessages at that email
• If possible start an iMessage thread and try sending an image
Remember: If you’re not entirely sure how to do any of these, refer back to the text and find out, the answers are above.
11. Introduction to e-Mail
![]()
The original smartphones were all about receiving email on the go, and your iPhone is no exception. While email providers like Gmail, Hotmail and Yahoo all have viable mobile websites, your iPhone has an excellent in-built mail app simply titled Mail. This allows you to check, organise and send email on the go without having to login to a webmail interface.
Adding a Mail Account
To add a mail account to your iPhone navigate to Settings > Mail, Contacts, Calendars > Add Account. You will see a selection of email providers, if yours is listed then tap it and follow the instructions specific to your account. For example, if you have a Gmail or Google Apps account then you will only need your full email address and password in order to setup the account.

In the final steps you will be able to choose which elements of the account should sync with your phone – Mail, Contacts and Calendar. You can then turn each element on or off from the Settings > Mail, Contacts, Calendar menu at any time without deleting the whole account.
Composing & Checking Mail
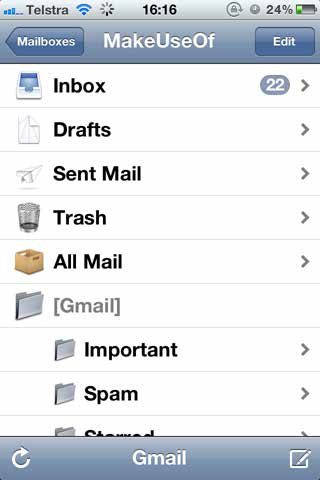
To check your email just tap and launch Mail. By default, your phone will display the All Inboxes view, which will give an overview of all new email in your inboxes regardless of account.

To read a message, tap it. To delete or archive a message, swipe horizontally across it (in either direction). You can also refresh your inbox using the circular arrow symbol in the bottom left. To access a specific account or folder, tap Mailboxes in the top left to be taken to the Mailboxes menu. Notice the two separate areas – Inboxes and Accounts.
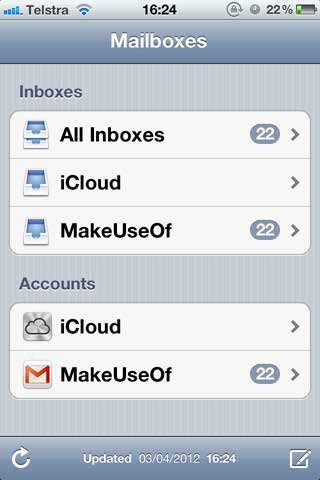
The top area (Inboxes) just shows new mail in your inbox, whereas the lower area (Accounts) allows you to access folders such as Drafts, Sent Messages and Spam. If you have a Gmail account that uses labels they will appear here as folders, though full functionality cannot be guaranteed.
To compose a new message at any time touch the button in the bottom right-hand corner. Regardless of what you are doing in Mail, the compose button is always available in the bottom right corner from any view. Add contacts by typing out email addresses, contact names or by selecting from your address book using the blue “+” symbol.

While reading an email message (screenshot, above) there are a number of options available to you at the bottom of the screen. These are, from left to right:
• Refresh – refreshes your inbox and checks for new mail
• Move – allows you to move a message into a particular folder
• Delete/Archive – depending on your account, this will archive (Gmail) or delete (most other email providers) the currently displayed message
• Reply – allows you to choose reply or reply all and return a message
• Compose – start a completely new email
It is also possible to mark messages as unread or flagged using the small blue Mark button in the subject field while viewing an email. You can also touch contacts to reveal email addresses, add to contacts or email directly.
Test Yourself
• Add an email account to your iPhone and check it
• Review your sent messages
• Compose a new message
• Flag an incoming message and mark an old message as unread.
Remember: If you’re not entirely sure how to do any of these, refer back to the text and find out, the answers are above.
12. Calendar
![]()
Many people rely on a good calendar solution to organise their busy lives, and the iPhone comes with a well-integrated app simply titled Calendar. The app is compatible with most popular desktop and cloud solutions, though Google Calendar users will need to set up Google Sync (covered in an upcoming lesson) in order to get the most out of it.
Calendar Basics
Your iPhone’s Calendar app will always show today’s date as its icon, providing quick one-glance access to the date. Opening the calendar reveals three options at the bottom of the screen:
• List – this lists all events, meetings and reminders in chronological order, with today’s date indicated by blue text. Tap on an event to view further detail, events that are greyed out indicate that the invitation has either been declined or marked as “maybe”
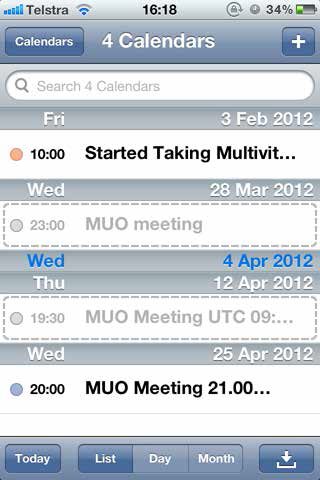
• Day – a basic daily overview of upcoming events and meetings

• Month – An overview of the whole month. Days that have entries are indicated by a dot beneath the date, tapping on a date reveals the day’s schedule in the area below the monthly view.

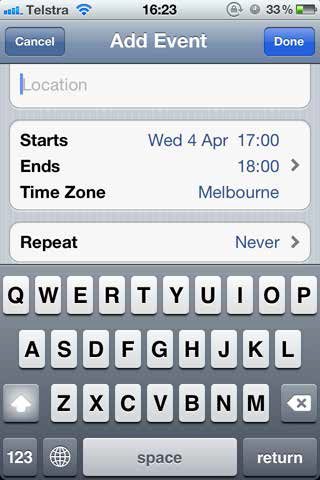
At any point while browsing your calendar you can return to the present date by tapping the Today button. If you have been invited to an event that you have yet to accept or decline, the arrow button in the bottom right corner will list all pending requests, though this doesn’t necessarily work “out of the box” with all calendar software. To add an event to your calendar use the plus “+” button in the top right of the screen. You can add information including location, time, duration, whether or not you would like to receive an alert and which calendar to add the event to. There are also fields for notes and a URL, if applicable.
iPhone 4S and 5 owners can add appointments easily via Siri – just tap and hold the home button and tell Siri where and when your appointment is, e.g. “Add meeting with sales on Friday at 3 to my work calendar” before reviewing and confirming the event.
Adding Calendar Accounts
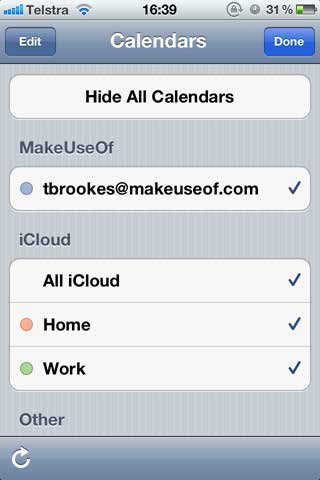
Calendar accounts (like Google Calendar) can be added to your iPhone using the same methods you learned in lesson 12 to add an email account. Navigate to Settings > Mail, Contacts, Calendars and choose Add Account. Input your credentials and in the final step ensure that Calendar is set to “On”. Navigate back to your calendar app and tap Calendars in the top left corner. All currently displayed calendars will be indicated by a tick, so ensure the one you just added is currently displayed, like in the screenshot below:
To manually refresh the calendar, tap the circular arrow button in the bottom left. If you use Outlook or iCal to manage your schedule then you will need to sync your iPhone with these services. This differs depending on your operating system, though it is possible using iTunes or iCloud (we will be covering iCloud in a future lesson).
• Mac users using iCal will simply need to select “Sync iCal Calendars” in iTunes before they sync their iPhone with their Mac.
• Windows users who are using Outlook can also choose to sync calendars in the same way via iTunes in their device’s overview on iTunes for Windows.
Outlook users who are using Office for Mac will need to sync their Outlook with iCal and then choose “Sync iCal Calendars” in iTunes. Microsoft have produced a video about this method which you can watch here.
Test Yourself
• Add an appointment to your Calendar with a reminder set for 10 minutes before the event
• Navigate to November 5, 2022 and then quickly return back to the current date
• Sync your Google Calendar, Outlook or iCal with your iPhone
Remember: If you’re not entirely sure how to do any of these, refer back to the text and find out, the answers are above.
13. Browsing and Safari
When the original iPhone was released in 2007 there was one thing it did better than anything else, and that was web browsing. Apple have continued to build on the original release of mobile Safari and the current version is a great way to surf the web with your thumbs. We’ll be covering the full range of Safari features over a couple of lessons in the course.
Browser Basics
Safari is the iPhone’s browser capable of surfing standard websites as well as mobile, smartphone-optimized ones. Safari uses the same WebKit rendering engine as Safari on OS X and Google’s Chrome browser, which makes it fast and able to handle much of the web, including HTML5, CSS3 and JavaScript.
Adobe Flash is not supported on the iPhone, and many services that rely on it for content (video sharing sites like YouTube and Vimeo) are still available with mobile-optimized streaming video instead. Bare in mind not all websites will substitute Flash for iPhone-friendly technologies, so not all will be viewable on your iPhone.
Navigation
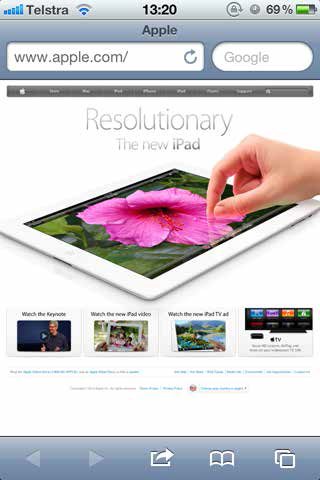
There are two bars at the top of Safari – the one on the left is the address bar, into which you input URLs e.g. www.
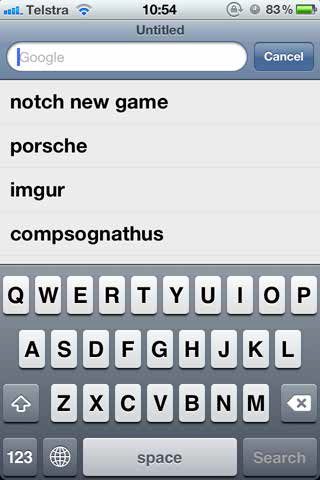
Google.com and the one on the right is the search bar into which you can directly input search queries.

At the bottom of the screen are navigation buttons, and these mostly come into play once you’ve started browsing. From left-to-right, the functions are:
• Back – returns you to the previous website in your browser history
• Forward – takes you to the next website in your browser history
• Share – a context menu for adding items to your bookmarks, mailing or tweeting the current displayed URL to a friend and so on (see below)
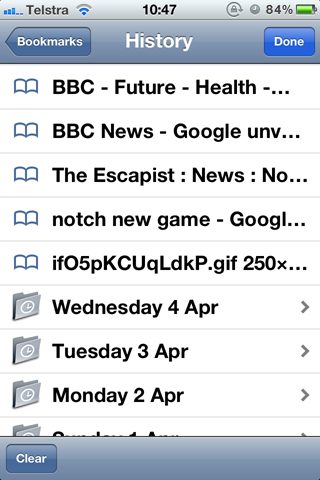
• Bookmarks/History – your bookmarks, which also contains a link to your browsing history (organised by date)
• Tabs – you can have up to 8 different web pages open at a time, this button allows you to open and access other instances as tabs. To open a new tab, tap New Page in the tabs menu

Browsing & Common Tasks
Both your address and search bars will save your past entries, and the search bar will even suggest popular search queries as you type.
If you would like to clear your history or cookies and temporary data then you can do so from the Settings > Safari menu. Under this menu it is also possible to change your default search engine from Google to either Yahoo! or Bing.
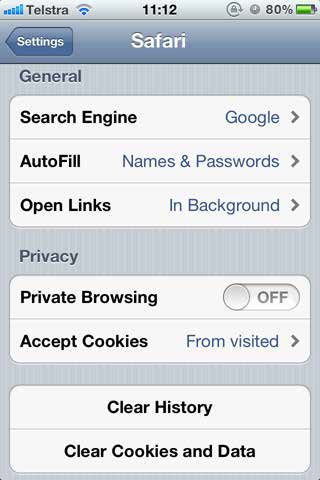
There is also an option for Private Browsing which, for as long as it is set to “On”, will not save any URLs or search queries you make. Browsing the web with Safari is a relatively painless experience, though remember if you are browsing the full Internet via your mobile service provider (not home Wi-Fi) to watch your data usage so as not to rack up a nasty phone bill.
Test Yourself
• Access your browser history
• Email a website link to yourself
• Open 3 tabs and navigate between them
Remember: If you’re not entirely sure how to do any of these, refer back to the text and find out, the answers are above.
About us and this blog
We are a digital marketing company with a focus on helping our customers achieve great results across several key areas.
Request a free quote
We offer professional SEO services that help websites increase their organic search score drastically in order to compete for the highest rankings even when it comes to highly competitive keywords.
Subscribe to our newsletter!
More from our blog
See all posts